Design College Website using HTML CSS

| Youtube : | https://youtu.be/OrotP642fbA |
| Views : | 27395 |
| Skills : | HTML , CSS |
| Category : | Web Design |
| Tag : | school,university,college |
In This Tutorial We Are Learning How To Make School Website With The Use Of HTML And CSS. In this website we are not going to use javascript or jquery. This website is going to be pure HTML and CSS.
- Section in school website
- Video Tutorial
- Let's start coding every section
- Meta Section
- Top Header section
- Logo And Main Menu section
- Slider and Notification Section
- About us section Section
- Notice Bord and Upcoming Events Section
- Popular Courses Section
- Principal Info Section
- Gallery Section
- Achievment Section
- Placement company Section
- Testimonial Section
- Footer Section
- Footer Copyright Section
Section We Are Going To Design In Our School Website
In our website, we are going to design three main section : Header section, Main Body And Footer section
In this tutorial we are going to design these three section with the help of their subsections. Subsections are created as per the website content.
Header
- Top header
- Logo
- Main menu
Main Body
- Slider section
- marquee, about us
- Notice Bord, Upcoming Events
- Gallery
Footer
- Quick link
- Contact information
- Social media link
- Copyright information
Video Tutorial
To see full coding video to understand easily. You can watch the video tutorial below.
Let's Start The Coding
Firstly, Create the folder on dekstop, my folder name is school website. Inside folder school website, create two sub folder : - 1) css and 2) images
Inside school website folder I am creating HTML file file name - index.html
Inside css folder I am creating CSS file - file name - style.css
Lest's start with writing basic HTML 5 code in index.html, and link the style.css file to index.html file
Meta html code. Copy And paste the code in index.html
index.html
<!---------- Meta HTML Starts --------->
<>
<>
<>Website Site<>
<>
<>
<>
<>
<!---------- Meta HTML Ends --------->
Common CSS. Copy and paste the code in style.css
style.css
/********** Common CSS Starts **********/
html, body {
     font-family Roboto, sans-serif, arial;
     font-size: 14px;
     color: #242424;
     font-weight: 400;
}
 html {
     -webkit-text-size-adjust:100%;
     -ms-text-size-adjust:100%;
     font-size:10px;
     -webkit-tap-highlight-color:transparent
}
 * {
     margin:0px;
     padding:0px;
     -webkit-box-sizing:border-box;
     -moz-box-sizing:border-box;
     box-sizing:border-box;
     margin:0;
     padding:0;
     outline:0
}
 .container {
     width:1150px;
     margin:0px auto;
     display:table;
}
 .width-100 {
     width:100%;
     float:left;
}
 .width-50 {
     width:50%;
     float:left;
}
 .width-25 {
     width:25%;
     float:left;
}
 .width-75 {
     width:75%;
     float:left;
}
 .width-80 {
     width:80%;
     float:left;
}
 .width-60 {
     width:60%;
     float:left;
}
 .width-40 {
     width:40%;
     float:left;
}
 .width-33 {
     width:33%;
     float:left;
}
 .width-30 {
     width:30%;
     float:left;
}
 .width-20 {
     width:20%;
     float:left;
}
 .main-section {
     width:100%;
     float:left;
     padding-top:80px;
     padding-bottom:80px;
}
 .bg-grey {
     background:#f0f3fa;
}
 .heading-section {
     font-size: 25px;
     text-align: center;
}
 .heading-section span {
     color: #787eff;
}
 .subhead-section {
     font-size: 16px;
     text-align: center;
     margin-bottom: 40px;
}
/********** Common CSS Ends **********/
2) Now, we will design Top Header section.
In our top header section, we are having icons and content. For Creating icons we are using font awesome and content are written in ul tag.
Please copy and paste the below code to design Top header section
Top Header section HTML code. Copy this code and paste in index.html file
index.html
<!---------- Top Header Starts --------->
<>
<>
<>
<>
<> <><><><> <>123-456-7890<> <><>
<><><><> <>info@yourmail.com<> <><>
<>
<>
<>
<>
<><><><> <><>
<><><><><> <>
<><><><><><>
<><><><><><>
<>
<>
<>
<>
<!---------- Top Header Ends --------->
Top Header section CSS code . Copy the code and paste in style.css
style.css
/********** Top Header Starts **********/
.header-top {
     background: #787eff;
     width: 100%;
     float: left;
}
 .header-left {
     list-style:none;
     float:left;
}
 .header-left li {
     float: left;
     padding: 10px 0px;
     margin-right: 20px;
}
 .header-left li a {
     font-size:15px;
     color:#ffffff;
     text-decoration:none;
}
 .header-right {
     list-style:none;
     float:right;
}
 .header-right li {
     float:left;
     padding: 10px 0px;
     margin-right:12px;
}
 .header-right li a {
     font-size:16px;
     color:#ffffff;
     text-decoration:none;
}
/********** Top Header Ends **********/
Output Of Top Header

3) Now, we will design Logo And Main Menu section.
In our logo and main menu section, we are having logo and nav bar. For Creating logo we have img tag and for nav bar we are using ul tag.
Please copy and paste the below code to design Logo and Main Menu section
Logo And Main Menu section HTML code. Copy this code and paste in index.html file
index.html
<!---------- Logo And Main Menu HTML Starts --------->
<>
<>
<>
<>
<>
<><>Home <><>
<><>About Us<><>
<><>Events<><>
<><>Notice<><>
<>
<>
<><> <>
<>
<>
<><>Addmission<><>
<><>Gallery<><>
<><>Blog<><>
<><>Contact Us<><>
<>
<>
<>
<>
<>
<!---------- Logo And Main Menu HTML Ends --------->
Logo And Menu section CSS code. Copy the code and paste in style.css
style.css
/********** Logo And Menu CSS Starts **********/
.header-menu {
     width: 100%;
     float: left;
     position: relative;
     padding:10px 0px 2px 0px;
}
 .logo {
     position: absolute;
     height:130px;
     width: auto;
     top: 0px;
}
 .header-menu ul {
     list-style:none;
     float:left;
}
 .header-menu ul li {
     float:left;
     color:black;
     margin: 20px 20px 20px 0px;
}
 .header-menu ul li a {
     text-decoration: none;
     font-weight:600;
     font-size: 18px;
     color: #484848;
}
/********** Logo And Menu CSS Ends **********/
Output of Logo And Menu Section
![]()
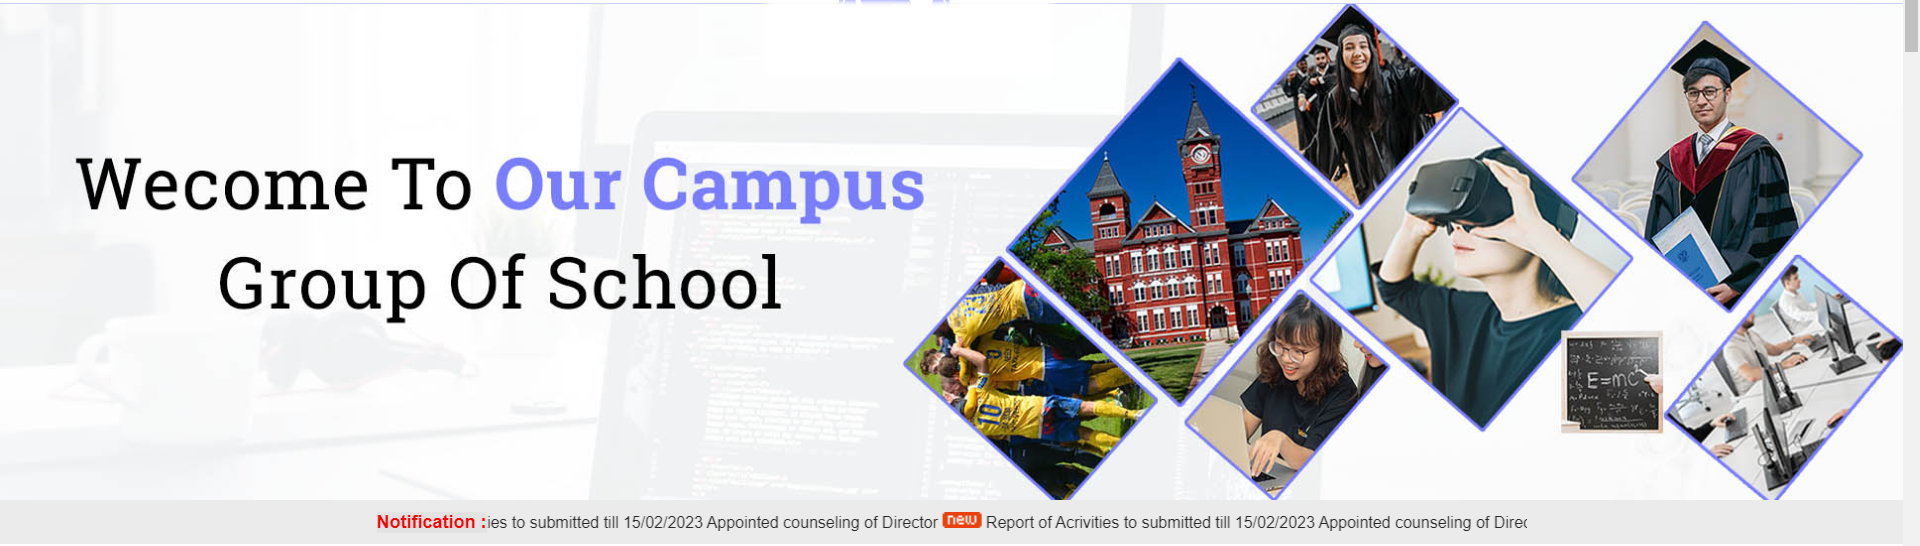
4) Now, we will design Slider and Notification section.
In our slider and notification section, we are having image and moving text. For Creating slider we have img tag and for moving text we have marquee tag.
Please copy and paste the below code to design Slider section
Slider and Notification section HTML code. Copy this code and paste in index.html file
index.html
<!---------- Slider and Notification HTML Starts --------->
<>
<>
<>
<>
<>
<>Notification : <>
<>
<> Report of Acrivities to submitted till 15/02/2023 Appointed counseling of Director <> Report of Acrivities to submitted till 15/02/2023 Appointed counseling of Director <> Report of Acrivities to submitted till 15/02/2023 Appointed counseling of Director
<>
<>
<>
<!---------- Slider and Notification HTML Ends --------->
Slider and Notification section CSS code. Copy the code and paste in style.css
style.css
/********** Slider and Notification CSS Starts **********/
.banner {
     width:100%;
     border-top:1px solid #cccfff;
}
 .notification {
     width: 100%;
     float: left;
     padding: 12px;
     background: #ebebeb;
}
 .notification b {
     color: red;
     font-size: 18px;
     float: left;
     position: absolute;
     background: #e3e3e3;
     z-index: 9999;
}
 .notification marquee {
     list-style:none;
     font-size: 16px;
}
 .notification marquee img {
     height:16px;
}
/********** Slider and Notification CSS Ends **********/
Output of Slider Section
5) Now, we will design About us section.
Now we are going to create second section after slider. In this section we have image and content Section. For creating image we have img tag
Please copy and paste the below code to design About us section
About us section HTML Code. Copy this code and paste in index.html file
index.html
<!---------- About us HTML Starts --------->
<>
<>
<>
<><> <>
<>
<>
<>
<>About us<>
<>Hi, Wecome To <>Our Campus <> Group Of College<>
<>Lorem ipsum dolor sit amet, consectetur adipiscing elit.Ut elit tellus, luctus nec ullamcorper mattis, pulvinar dapibus leo. Lorem ipsum dolor sit amet, consectetur adipiscing elit.Ut elit tellus, luctus nec ullamcorper mattis, pulvinar dapibus leo.<>
<>Lorem ipsum dolor sit amet, consectetur adipiscing elit.Ut elit tellus, luctus nec ullamcorper mattis, pulvinar dapibus leo.<>
<>
<>
<>
<>Best Trainer<>
<>2022-2023<>
<>
<>
<>
<>
<>
<>Best Porfomance<>
<>2022-2023<>
<>
<>
<>
<>
<>
<>Top Placement<>
<>500+<>
<>
<>
<>
<>
<>
<>
<!---------- About us HTML Ends --------->
About us section CSS code. Copy the code and paste in style.css
style.css
/********** About us CSS Starts **********/
.about-img img {
     width:100%;
     padding:0px 25px 0px 0px;
}
 .about-detail h6 {
     font-size:16px;
     color: #787eff;
}
 .about-detail h1 {
     font-size: 32px;
     margin:5px 0px 10px 0px;
     color: #1f2836;
}
 .about-detail h1 span {
     color: #787eff;
}
 .about-detail p {
     font-size: 14px;
     line-height: 25px;
     color: #1e1e1e;
}
 .about-box {
     width:94%;
     float: left;
     margin-right: 1%;
     border-radius:5px;
     padding: 15px 15px;
     text-align:center;
     margin-top:10px;
     border: 2px solid #787eff;
}
 .about-box img {
     height:100px;
}
 .about-box h5 {
     font-size: 16px;
     margin-top:10px;
     margin-bottom: 5px;
}
/********** About us CSS Ends **********/
OUTPUT Of About us Section
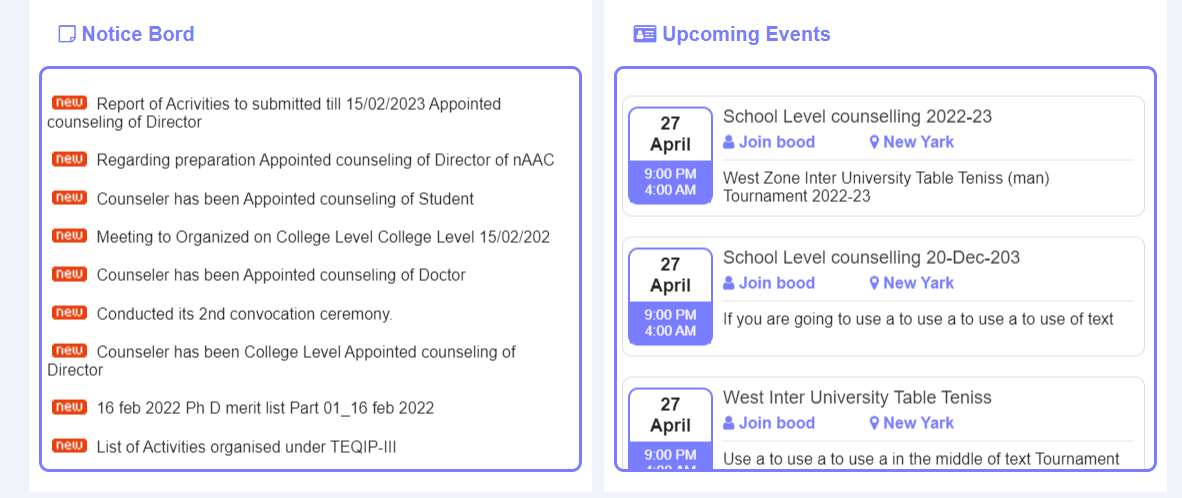
6) Now, we will design Notice Bord and Upcoming Events section.
In our Notice Bord and Upcoming Events section, we are having image and content which are moving down to up. For Creating that we are using marquee tag.
Please copy and paste the below code to design Notice Bord and Upcoming Events section
Notice Bord and Upcoming Events section HTML code. Copy this code and paste in index.html file
index.html
<!---------- Notice Bord and Upcoming Events HTML Starts --------->
<>
<>
<>
<>
<><><> Notice Bord<>
<>
<>
<>
<><> Report of Acrivities to submitted till 15/02/2023 Appointed counseling of Director<>
<><> Regarding preparation Appointed counseling of Director of nAAC<>
<> <> Counseler has been Appointed counseling of Student <>
<> <> Meeting to Organized on College Level College Level 15/02/202 <>
<> <> Counseler has been Appointed counseling of Doctor <>
<> <> Conducted its 2nd convocation ceremony. <>
<> <> Counseler has been College Level Appointed counseling of Director <>
<> <> 16 feb 2022 Ph D merit list Part 01_16 feb 2022 <>
<> <> List of Activities organised under TEQIP-III <>
<> <> School of Architecture College Level counselling 2022-23 <>
<> <> Documents for empanellment of vendor for A Class contyractor <>
<> <> Counseler has been Appointed counseling of Director <>
<> <> Counseler has been Appointed counseling of Director <>
<> <> Counseler has been Appointed counseling of Director <>
<>
<>
<>
<>
<>
<>
<>
<><><> Upcoming Events<>
<>
<>
<>
<>
<>
<>27 <>
April
<>
<>9:00 PM<>
4:00 AM
<>
<>
<>
<> School Level counselling 2022-23<>
<><><><> Join bood<> <><><> New Yark<>
<>West Zone Inter University Table Teniss (man) Tournament 2022-23<>
<>
<>
<>
<>
<>27 <>
April
<>
<>9:00 PM<>
4:00 AM
<>
<>
<>
<> School Level counselling 20-Dec-203<>
<><><><> Join bood<> <><><> New Yark<>
<>If you are going to use a to use a to use a to use of text<>
<>
<>
<>
<>
<>27 <>
April
<>
<>9:00 PM<>
4:00 AM
<>
<>
<>
<>West Inter University Table Teniss<>
<><><><> Join bood<> <><><> New Yark<>
<>Use a to use a to use a in the middle of text Tournament<>
<>
<>
<>
<>
<>
<>
<>
<>
<>
<!---------- Notice Bord and Upcoming Events HTML Ends --------->
Notice Bord and Upcoming Events section CSS code. Copy the code and paste in style.css
style.css
/********** Notice Bord and Upcoming Events CSS Starts **********/
.notice-board-sect {
     background: #fff;
     float: left;
     margin: 0px auto;
     display: table;
     width: 98%;
     padding: 15px 10px 20px 10px;
}
 .notice-board-sect h2 {
     font-size: 20px;
     text-align: left;
     padding: 10px 10px 10px 20px;
     width: 100%;
     float: left;
     color: #787eff;
}
 .notice-board {
     width: 100%;
     float: left;
     border:3px solid #787eff;
     margin-top: 10px;
     border-radius: 10px;
}
 .notice-board ul {
     list-style:none;
     width: 100%;
     float:left;
     padding:0px 10px 0px 5px;
}
 .notice-board ul li {
     width: 100%;
     float:left;
     font-size: 16px;
     margin-bottom:20px;
}
 .notice-board img {
     margin-right: 5px;
     margin-left: 5px;
     width:35px;
}
 .event-list {
     width: 100%;
     float: left;
     padding:0px;
}
 .event-list li {
     width: 100%;
     float: left;
     box-shadow: 0px 0px 2px 0px #ffffff1f;
     margin-bottom: 20px;
     list-style: none;
     padding: 10px 6px 10px 5px;
     border: 1px solid #dddddd;
     border-radius: 10px;
}
 .event-date {
     float: left;
     width:85px;
     text-align: center;
     border:2px solid #787eff;
     padding-top: 5px;
     border-radius: 10px;
}
 .event-date h3 {
     font-size: 18px;
     padding-top: 0px;
}
 .event-date p {
     font-size: 14px;
     background: #787eff;
     color: #fff;
     padding: 5px;
     margin-top: 5px;
}
 .event-content {
     float: left;
     width: calc(100% - 90px);
     padding: 0px 0px 0px 10px;
}
 .event-content h5 {
     font-size:18px;
     margin-bottom: 6px;
     color: #424242;
     font-weight: 500;
}
 .event-content a {
     color: #787eff;
     text-decoration: none;
     font-weight: bold;
     margin-right: 50px;
}
 .event-content p {
     font-size: 16px;
     border-top: 1px solid #e3e3e3;
     margin-top: 8px;
     padding-top: 9px;
}
/********** Notice Bord and Upcoming Events CSS Ends **********/
OUTPUT Of Notice Bord and Upcoming Events Section
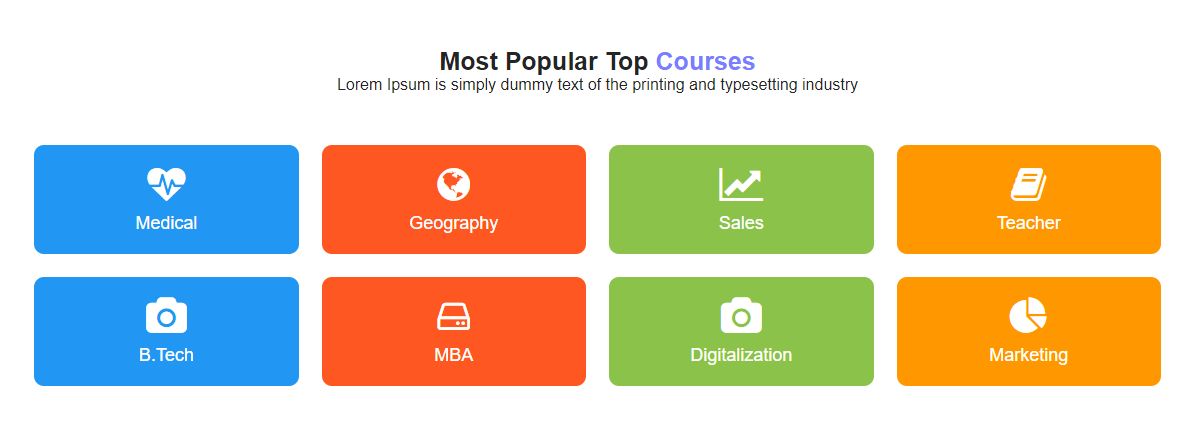
7) Now, we will design Popular Courses section.
In our Popular Courses section, we are having multiple images at a particular width. For Creating images we have img tag.
Please copy and paste the below code to design Popular Courses section
Popular Courses section HTML code. Copy this code and paste in index.html file
index.html
<!---------- Popular Courses HTML Starts --------->
<>
<>
<> Most Popular Top <>Courses<> <>
<>Lorem Ipsum is simply dummy text of the printing and typesetting industry<>
<>
<>
<> <>
<>Medical<>
<>
<>
<> <>
<>Geography<>
<>
<>
<> <>
<>Sales<>
<>
<>
<> <>
<>Teacher<>
<>
<>
<>
<>
<> <>
<>B.Tech<>
<>
<>
<> <>
<>MBA<>
<>
<>
<> <>
<>Digitalization<>
<>
<>
<> <>
<>Marketing<>
<>
<>
<>
<>
<!---------- Popular Courses HTML Ends --------->
Popular Courses section CSS code. Copy the code and paste in style.css
style.css
/********** Popular Courses CSS Starts **********/
.course-list {
     width: 100%;
     float:left;
     padding:0px;
     list-style:none;
}
 .course-list li {
     width: 23%;
     float: left;
     list-style: none;
     text-align: center;
     padding: 20px 2px;
     margin:1%;
     border-radius:10px;
}
 .course-list p {
     color:#000;
     font-size:18px;
     margin-top:10px;
     color: #fff;
}
 .course-list i {
     font-size:38px;
     color: #fff;
}
 ul.course-list li:nth-child(1) {
     background: #2196f3;
}
 ul.course-list li:nth-child(2) {
     background: #ff5722;
}
 ul.course-list li:nth-child(3) {
     background: #8bc34a;
}
 ul.course-list li:nth-child(4) {
     background: #ff9800;
}
/********** Popular Courses CSS Ends **********/
OUTPUT Of Popular Courses Photos
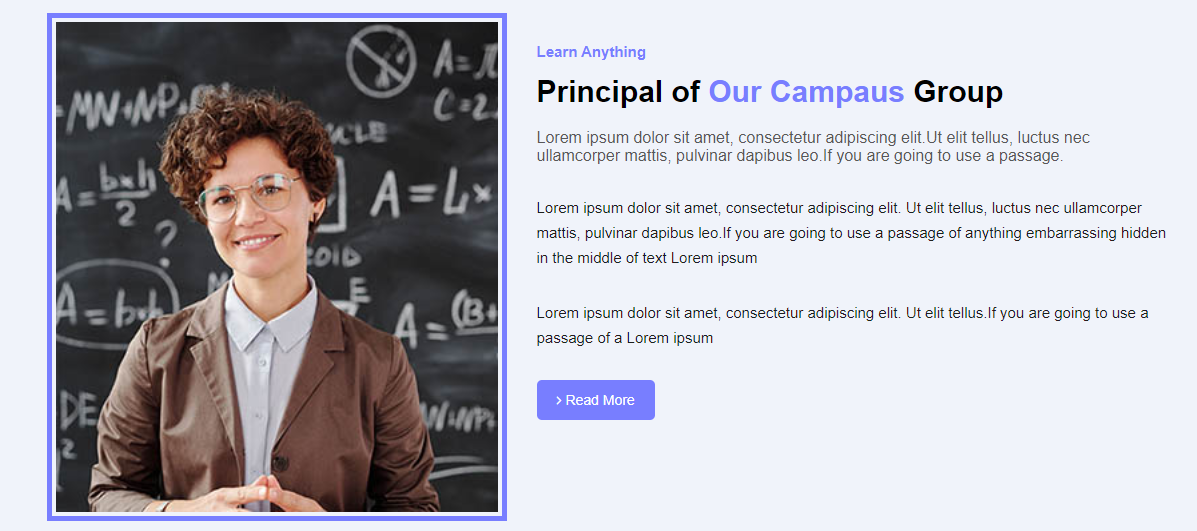
8) Now, we will design Principal Info section.
In our Principal Info section, we are having top Principal images and content. For Creating images we have img and for content we are using p, button tag
Please copy and paste the below code to design Recruiter List section
Principal Info section HTML code. Copy this code and paste in index.html file
index.html
<!---------- Principal Info HTML Starts --------->
<>
<>
<>
<> <> <>
<>
<>
<>
<>Learn Anything<>
<>Principal of <>Our Campaus<> Group<>
<>Lorem ipsum dolor sit amet, consectetur adipiscing elit.Ut elit tellus, luctus nec ullamcorper mattis, pulvinar dapibus leo.If you are going to use a passage.<>
<>Lorem ipsum dolor sit amet, consectetur adipiscing elit. Ut elit tellus, luctus nec ullamcorper mattis, pulvinar dapibus leo.If you are going to use a passage of anything embarrassing hidden in the middle of text Lorem ipsum<>
<>Lorem ipsum dolor sit amet, consectetur adipiscing elit. Ut elit tellus.If you are going to use a passage of a Lorem ipsum<>
<><><> Read More<>
<>
<>
<>
<>
<!---------- Principal Info HTML Ends --------->
Principal Info section CSS code. Copy the code and paste in style.css
style.css
/********** Principal Info CSS Starts **********/
.principal-img img {
     width:100%;
     border:5px solid #787eff;
     padding:4px
}
 .principal-info {
     width: 100%;
     float: left;
     padding:30px;
}
 .principal-info h6 {
     font-size: 15px;
     margin-bottom: 15px;
     color: #787eff;
}
 .principal-info h1 {
     color: black;
     font-size: 30px;
     margin-bottom: 20px;
}
 .principal-info h1 span {
     color: #787eff;
}
 .principal-info h5 {
     font-size: 16px;
     margin-bottom: 30px;
     font-weight: 400;
     color:#585858;
}
 .principal-info p {
     font-size: 15px;
     margin-bottom: 30px;
     line-height: 25px;
     color:#1e1e1e;
}
 .principal-info a {
     background: #787eff;
     text-decoration: none;
     color: #fff;
     padding: 12px 20px;
     float: left;
     border-radius: 5px;
}
/********** Principal Info CSS Ends **********/
OUTPUT Of Principal Info
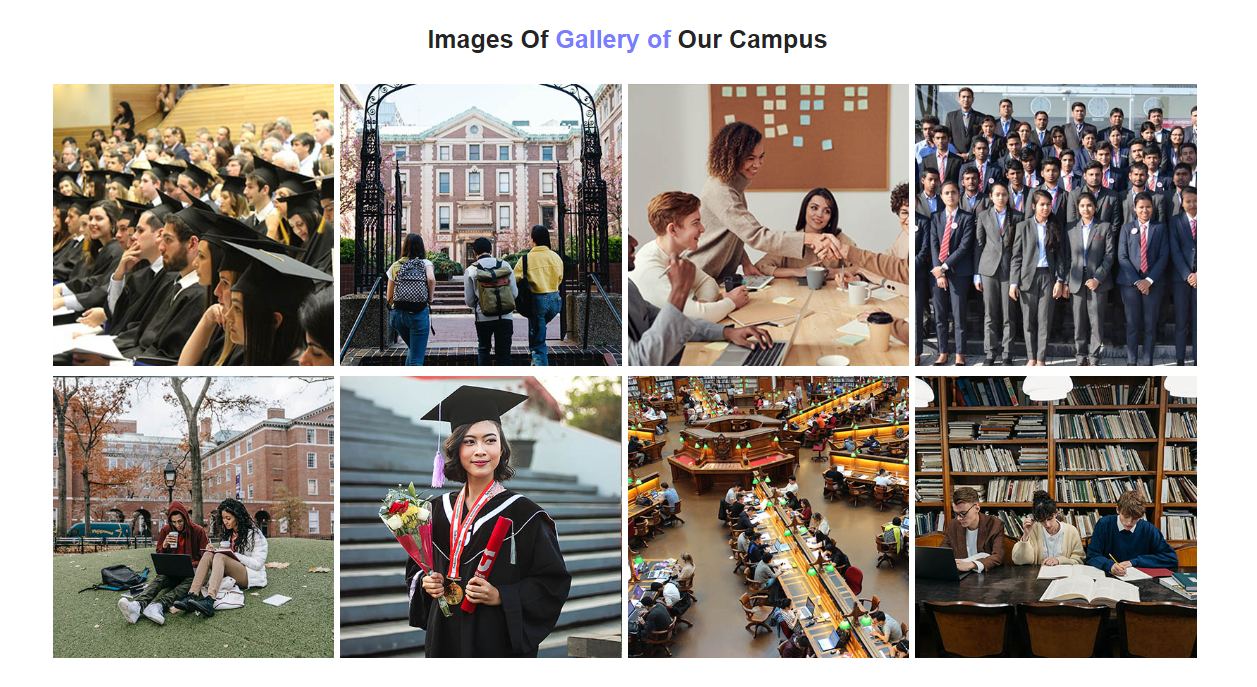
9) Now, we will design Gallery section.
In our Gallery section, we are having images at a particular width. For Creating images we have img tag.
Please copy and paste the below code to design Gallery section
Gallery section HTML code. Copy this code and paste in index.html file
index.html
<!---------- Gallery HTML Starts --------->
<>
<>
<>Images Of <>Gallery of<> Our Campus<>
<><>
<>
<><><>
<><><>
<><><>
<><><>
<><><>
<><><>
<><><>
<><><>
<>
<>
<>
<!---------- Gallery HTML Ends --------->
Gallery section CSS code. Copy the code and paste in style.css
style.css
/********** Gallery CSS Starts **********/
.gallery {
     width: 100%;
     float: left;
     margin-top: 30px;
}
 .gallery img {
     height: auto;
     width: 98%;
     margin-bottom: 10px;
}
/********** Gallery CSS Ends **********/
OUTPUT Of Gallery Section
10) Now, we will design Achievment section.
In our achievment section, we are having images and icons. For Creating images and icons we have img tag and font awesome icons.
Please copy and paste the below code to design achievment section
Achievment section HTML code. Copy this code and paste in index.html file
index.html
<!---------- Achievement HTML Starts --------->
<>
<>
<>
<>
<><>
<>88,000<>
<>Student Enrolled<>
<>
<>
<>
<>
<><>
<>49,555<>
<>Class Complete<>
<>
<>
<>
<>
<><>
<>219<>
<>Skilled Instructors<>
<>
<>
<>
<>
<><>
<>125<>
<>Overall Course's<>
<>
<>
<>
<>
<!---------- Achievement HTML Ends --------->
Achievement section CSS code. Copy the code and paste in style.css
style.css
/********** Achievement CSS Starts **********/
.counter {
     text-align: center;
     padding: 30px 20px 30px 20px;
     width: 90%;
     margin: 1%;
     background: #787eff;
     color: #fff;
     border-radius:10px;
}
 .counter i {
     font-size:50px;
}
 .counter h5 {
     font-size: 25px;
     margin-top: 10px;
}
 .counter p {
     font-size:14px;
}
/********** Achievement CSS Ends **********/
OUTPUT Of Achievement Section

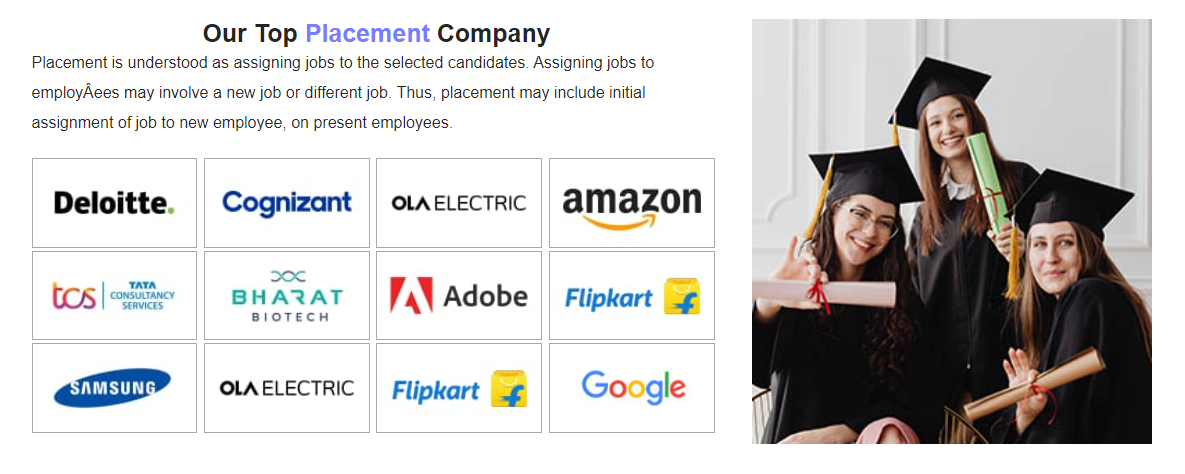
11) Now, we will design Placement company section.
In our Placement company section, we are having Placement company information and logo. For Creating logo we have img tag.
Please copy and paste the below code to design Placement company section
Placement Company section HTML code. Copy this code and paste in index.html fileindex.html
index.html
<!---------- Placement Company HTML Starts --------->
<>
<>
<>
<>
<>Our Top <>Placement<> Company<>
<>Placement is understood as assigning jobs to the selected candidates. Assigning jobs to employÂees may involve a new job or different job. Thus, placement may include initial assignment of job to new employee, on present employees.<>
<>
<><><>
<><><>
<><><>
<><><>
<><><>
<><><>
<><><>
<><><>
<><><>
<><><>
<><><>
<><><>
<>
<>
<>
<><><>
<>
<>
<!---------- Placement Company HTML Ends --------->
Placement Company section CSS code. Copy the code and paste in style.css
style.css
/********** Placement Company CSS Starts **********/
.placement p {
     font-size: 16px;
     color: #2a2a2a;
     line-height: 30px;
}
 .placement ul {
     width: 100%;
     float: left;
     list-style:none;
     padding:0px;
     margin-top: 20px;
}
 .placement ul li {
     width: 24%;
     float: left;
     margin-right: 1%;
}
 .placement ul li img {
     width: 100%;
     border: 1px solid darkgrey;
}
 .placement-img {
     width:100%;
     padding:0px 30px 30px 30px;
}
/********** Placement Company CSS Ends **********/
OUTPUT Of Placement Company Section
12) Now, we will design Testimonial section.
In our testimonial section, we are having content and images that are moving from right to left. For Creating movement we are using marquee tag.
Please copy and paste the below code to design testimonial section
Testimonial section HTML code. Copy this code and paste in index.html file
index.html
<!---------- Testimonial HTML Starts --------->
<>
<>
<> What <>Student Say's<> About Our Campus<>
<>Lorem Ipsum is simply dummy text of the printing and typesetting industry <>
<>
<>
<>
<> <> <>
<>
<>
<><>Julia Mikasa<><>
<>Web Developer <>
<>
<>
<> <><> <>
<>
<>
<>Great Courses<>
<> Lorem Ipsum is simply dummy text of the print<>
and typesetting industry.Lorem Ipsum has been<>
the industry's standard dummy text ever since<>
the 1500s, when an unknown printer a galley.
<>
<><> <><> <><> <><> <><>
<>
<>
<>
<>
<>
<!---------- Testimonial HTML Ends --------->
Testimonial section CSS code. Copy the code and paste in style.css
style.css
/********** Testimonial CSS Starts **********/
.tetimonial {
     width: 340px;
     background: white;
     border: 1px solid rgb(0 0 0/10%);
     padding: 35px 15px;
     float: left;
     margin-right:10px;
}
 .tetimonial img {
     border-radius:50px;
     width:100%;
}
 .tetimonial-user {
     padding-left: 15px;
     padding-top: 5px;
}
 .tetimonial-user h4 {
     font-size: 16px;
     color: black;
     margin-bottom: 5px;
}
 .tetimonial-user p {
     color: #818385;
     font-size: 12px;
}
 .tetimonial .fa-quote-right {
     font-size:40px;
     margin-top: 5px;
     color:#787eff;
}
 .testimonial-comment {
     width: 100%;
     float: left;
     margin-top: 30px;
}
 .testimonial-comment h4 {
     color: #787eff;
     font-size: 20px;
     margin-bottom:15px;
}
 .testimonial-comment p {
     font-size: 15px;
     margin-bottom:20px;
     ;
     line-height: 25px;
     color:#1f2836;
}
 .testimonial-comment i {
     color:#ff5722;
     font-size:18px;
}
/********** Testimonial CSS Ends **********/
OUTPUT Of Testimonial Section

13) Now, we will design Footer section.
In our footer section, we are having our campus, quick links, get in touch and social media icons. For Creating footer section we have ul, a(anchor) tag .
Please copy and paste the below code to design Footer section
Footer Section Code. Copy this code and paste in index.html file
index.html
<!---------- Footer HTML Starts --------->
<>
<>
<>
<>Our Campus<>
<>Lorem Ipsum is simply dummy text of the printing and typesetting industry. Lorem Ipsum has been the industry's standard dummy text ever since the 1500s, when an unknown printer took a galley of type and scrambled.<>
<><> <><> <><> <><>
<>
<>
<> Quick Links<>
<>
<>
<><><><> About us<><>
<><><><> Courses Grid <><>
<> <><><> Courses Details<><>
<> <><><> Events <><>
<> <><><> Event Details<><>
<><><><> Gallery<><>
<><><><> Teachers <><>
<><> <><> FAQ<><>
<><> <><> Login <><>
<><> <><> Contact Us <><>
<>
<>
<>
<>
<>Get In Touch<>
<> Subscribe with us to get a quick notification of our latest update's.<>
<>
<><><> Submit<>
<>
<>
<!---------- Footer HTML Ends --------->
Footer section CSS code. Copy the code and paste in style.css
style.css
/********** Footer CSS Starts **********/
.footer-section {
     padding-top: 50px;
     padding-bottom:20px;
     background: #787eff;
     width: 100%;
     float: left;
}
 .footer-section h3 {
     font-size:28px;
     color:#fff;
}
 .footer-section p {
     font-size: 14px;
     line-height: 25px;
     color: #fff;
     margin-top: 20px;
     padding: 0px 30px 0px 0px;
}
 .footer-about i {
     border: 1px solid #e5e3e3;
     font-size: 20px;
     margin-right: 10px;
     margin-top:20px;
     background: #fff;
     border-radius: 50%;
     height: 40px;
     width: 40px;
     text-align: center;
     line-height: 40px;
     color: #787eff;
}
 .quick-link ul {
     margin-top:30px;
     list-style:none;
     float:left;
     width: 100%;
}
 .quick-link li {
     width: 50%;
     float:left;
     margin-bottom: 10px;
}
 .quick-link li a {
     font-size:14px;
     color:#fff;
     text-decoration:none;
}
 .subscribe-us input {
     margin-top:20px;
     padding: 10px;
     border: 1px solid #e5e3e3;
     border-radius: 5px;
     width: 100%;
     color: #000000;
     text-align: left;
     background: #fff;
     height: 42px;
}
 .subscribe-us button {
     padding: 12px;
     background: #ff5722;
     color: white;
     font-size: 14px;
     width: 100%;
     float: left;
     margin-top: 10px;
     border: none;
}
/********** Footer CSS Ends **********/
OUTPUT Of Footer Section

14) Now, we will design Footer Copyright section.
In our copyright information section, we are having copyright information. For Creating copyright information we have p tag it stands for paragraph.
Please copy and paste the below code to design Footer section
Footer Copyright section HTML code. Copy this code and paste in index.html file
index.html
<!---------- Footer Copyright HTML Starts --------->
<> Copyright @ 2023 All Copyright dezven.com<>
<>
<>
<>
<!---------- Footer Copyright HTML Ends --------->
Footer Copyright section CSS code. Copy the code and paste in style.css
style.css
/********** Footer Copyright CSS Starts **********/
.copyright {
     text-align: center;
     border-top: 1px solid #b3b3b3;
     margin-top: 30px;
     padding-top:20px;
     color: #fff;
}
/********** Footer Copyright CSS Ends **********/
OUTPUT Of Footer Copyright Section

how to create college website using HTML and CSS
How To Create School Website Using HTML And CSS
How To Create A College Website Using HTML AND CSS With Source Code
How To Design School / College Website Using HTML, CSS with source code
How to design simple college website using html and css
How To Design School / College Website Using HTML And CSS
How to Create an School/College Website using HTML CSS
my icons are showing up as boxes
sir you are awesome video thank you very much
amazing so easy to follow thank you
Thank you for this awesome tutorial!
Great Work and effort Bro.
Great Tutorial
It is really helpful. Thank you so much....